Document your REST API with Swagger
Swagger is a great tool to allow you do document your REST based APIs and provides an interactive sandbox for clients or testers to interact with the API. Certainly go and check out what Swagger has to offer at Swagger.io .
However as I found as of 2016, most of the examples available on the web regarding how to get Swagger up and running details what to do when you are using Spring-boot. Therefore I’m providing my write up to assist anyone who is trying to make swagger available form a SpringMVC application. I had a surprising level of pain getting it to work, considering the lack of details regarding specifics for this type of application.
As is becoming common in my posts, I will first provide you a quick summary of the stack (tools/framework in play). Things are constantly evolving and you will need to assess your frameworks and version versus what I used in May of 2016.
Prerequisite Stack:
- Spring-core 4.2.4-RELEASE
- Spring-webmvc 4.2.4-RELEASE
- Springfox-swagger2 2.4.0
- Bootstrap 3.3.5 webjars
- Maven 3.0.5
- Running on Apache Tomcat 7.0.67
Background: Hopefully you already have a SpringMVC based REST API application on which you can try enabling Swagger. First you will notice that there are now versions 1.2 and versions 2.0 of Swagger. This post deals with working and configuring Swagger 2. Springfox is a library developed to allow you to plug swagger into Spring based applications (Spring, Spring-boot, or SpringMVC). The library supports both the the Swagger 1.2 and 2.0 specs. Note that Springfox replaced the Swagger-SpringMVC implementation. Wire it up:
- Most of the documentation you will find will tell you to add the io.springfox Swagger maven dependency
io.springfox springfox-swagger2 2.4.0
- Then details of Spring annotated Configuration class that uses the Docket class in replace of the old SwaggerSpringMvcPlugin. A typical example class you see will probably look like
    @Configuration
    @EnableSwagger2
    public class SwaggerConfiguration {

    @Bean
    public Docket api() {
      return new Docket(DocumentationType.SWAGGER_2)
              .select()
              .apis(RequestHandlerSelectors.any())
              .paths(PathSelectors.any())
              .build();
      }
    }
The @Configuration annotation tells Spring to use the class for configuration of the Spring IOC Container. The @EnableSwagger2 indicates to activate the Swagger2.0 specification. The Docket as indicated is the replacement for the old SwaggerSpringMvcPlugin and is the primary api configuration mechanism to initialize swagger (v2.0). The .apis() selector allows you to indicate any or matching criteria for request handlers. The .paths() selector allows you to select any resource paths or filter on certain matches sets (regex matches for example).
- Then if you want to include the nice sandbox and reference HTML produced by Swagger!
then add the swagger ui-maven dependency.
<dependency>
<groupId>io.springfox</groupId>
<artifactId>springfox-swagger-ui</artifactId>
<version>2.4.0</version>
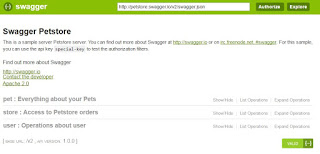
</dependency>Then it says you are good to go to build your maven project and deploy to your container. Then you should be able to access the swagger api-docs via http:////v2/api-docs/ and the swagger-ui from url http:////swagger-ui.html Nothing: To your dismay you will probably find you get a 404 when trying to access the api-docs url and you will not see any errors in your container or application logs. I will not re-trace all of the things I tried to get this running, but I will detail what needed to be done in the end (it ended up being relatively simple). The key:
You may find buried within the Springfox Reference Documentation the key, in section 5.5 Docket Spring Java Configuration. There is a NOTE: that @EnableWebMvc is needed for non-springboot applications. So now your Configuration class should look like:
  @Configuration
  @EnableWebMvc
  @EnableSwagger2
  public class SwaggerConfiguration {

    @Bean
    public Docket api() {
      return new Docket(DocumentationType.SWAGGER_2)
              .select()
              .apis(RequestHandlerSelectors.any())
              .paths(PathSelectors.any())
              .build();
    }
  }
I should probably also mention that you do need to have component-scan configured either in your xml configuration for the dispatcher, or the Configuration class. I would assume you already had that in place, if you had a working spring webmvc application. I have placed it in my xml configuration
1B) The Swagger mapping key: Be careful the default configuration of Swagger resources may bite you or not. Depending on how you have your
  <!-- This configuration is to support nesting the swagger-ui on there /services/ relative servlet mapping
         instead of the default route. -->
    <mvc:resources mapping="**/**"
                   location="classpath:/META-INF/resources/" />
Note: If you have moved to entire Annotation based configuration you can also do this in a Configuration class that extends the WebMvcConfigurerAdapter and override the addResourceHandlers method. An example would look like:
    @Override
    public void addResourceHandlers(ResourceHandlerRegistry registry) {
        registry.addResourceHandler("**/**")
                .addResourceLocations("classpath:/META-INF/resources/");
    }
Finished Now when you rebuild your application and deploy, you should be able to access both the api-docs and swagger-ui (http:////v2/api-docs/ and http:////swagger-ui.html. Enjoy.