After successfully getting the monolithic service up and running through Part I, Part II is breaking down that monolith into multiple microservices that will be hosted in their own Docker container. Remember from the earlier parts of this series I’m utilizing the GitHub project that was put together by some AWS resources and located at https://github.com/aws-samples/amazon-ecs-java-microservices/tree/master/2_ECS_Java_Spring_PetClinic_Microservices. This link goes directly to their part II of the project.
The monolith will actually get broken down into 4 microservices:
/pet -> A service for all pet related REST paths /vet -> A service for all vet related REST paths /visit -> A service for all visits related REST paths /owner -> A service for all owner related REST paths
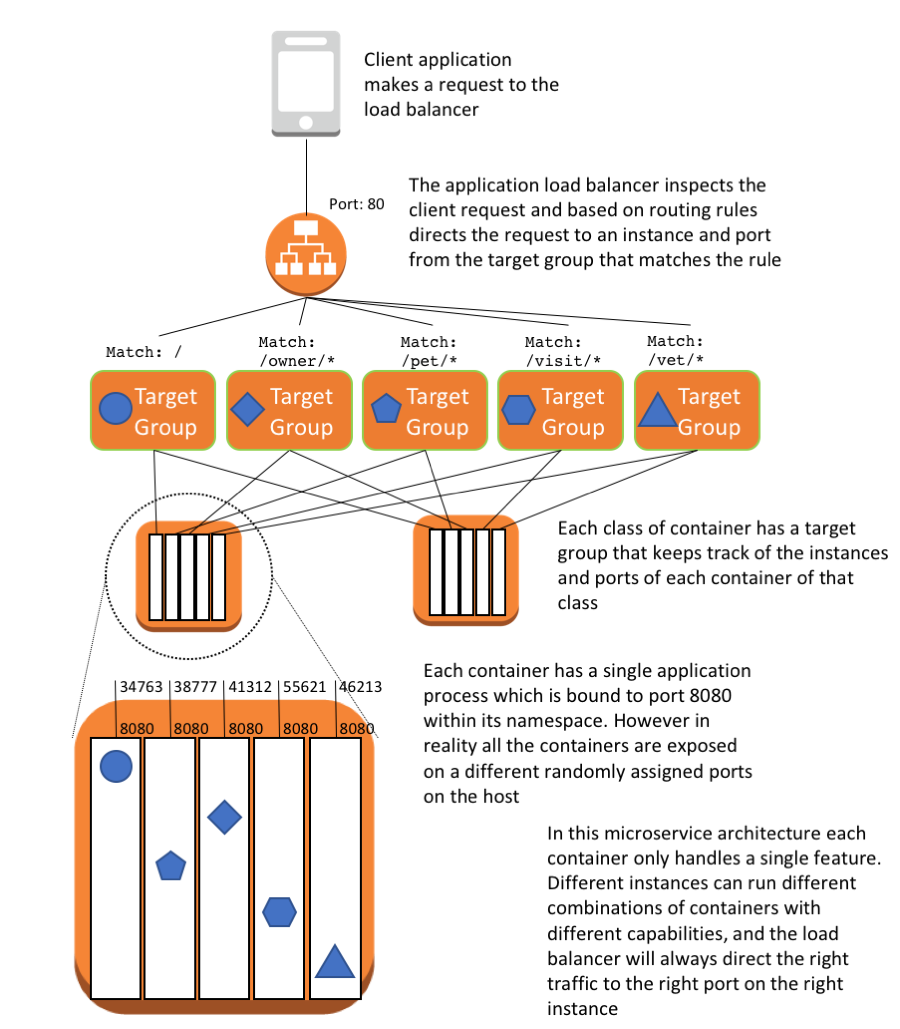
The diagram that is part of their GitHub project documentation, and what is re-posted here, gives a nice visual of how everything is structured after the refactoring of the cloud formation stack (moving from a monolith to containerized microservices).

You can see in this breakout that there are multiple Docker containers that are defined and get created. In this particular setup each Docker container only handles one single set of features (set of REST paths: pet, vet, visit, owner). You can also see how each Docker container is setup with the service listening on port 8080. However the TargetGroups that get created handle the mapping to a dynamically assigned port on the EC2 instance itself. The TargetGroups are updated by ECS (Elastic Container Service). They always have an up to date list of service containers in the cluster of EC2 instances and what port each of those containers are accessible on for that particular application group (pet, vet, visit, owner). Obviously you wouldn’t be able to have 4 Docker containers running on the same EC2 host all running on port 8080.
As seen with the Part I python setup script there were similar issues with the Part II setup script. I’m not calling out all the issues in this post, but as before I have posted my version of the setup.py script (posted at the bottom of the blog entry). Feel free to review, download and use. Recall this was to actually get the scripts to work with Boto3 and Python 3.x. Feel free to review the Part I post for more details and information.
Please note this script is creating multiple t2.medium sized EC2 containers and t2.medium sized MySQL RDS. You will incur sizable cost if you leave this stack up and running for extended periods.
I spent a lot of time playing with different size containers. I would have really liked to have gotten this down to using t2.micro instances like Part I, but was seeing a lot of instability in getting the entire stack to spin up.
I also saw a lot of issues of the TargetGroups successfully detecting healthy micro service instances (Docker containers running on the EC2 hosts). I would see targets being initialized and then many of them going unhealthy. It seemed random whether it would consider a target healthy or not. If you use this current script you should get a working setup, but you may need to wait 5 - 10 minutes for everything to stabilize. After running the setup.py script, log into the AWS console and take a look at the Load Balancer Target Groups. Then look at the health status of the actual targets. There obviously are other settings that must need to be tweaked to enable using smaller EC2 hosts and have the stack spin up reliably and remain stable. I may revisit and provide updates. I really would like to understand this better, but could not find any good succint documentation on why it might be happening. I did try to introduce a waiter into the script. I had a hypothesis that the ELB (Load Balancer) was provisioned but not fully active and the cloud formation was then just proceeding to create the TargetGroups. I introduced this block into the script to try and make sure the ELB was fully provisioned before attempting to create the TargetGroups:
#introduce waiter to insure elb is available before creating targets or listeners.
elb_waiter = elb_client.get_waiter("load_balancer_available")
elb_names = [elb_name]
elb_waiter.wait(Names=elb_names)
logger.info("ELB available and active")
It did not seem to have any real impact. I think there might be something going on with each of the YAML files that are defining the parameters of each of the services: CPU shares, mem_limit and ports. These files can be found under the src/main/docker folders of each of the micro service folders. You would need to download all of the source from the amazon-ecs-java-microservices github project to see them. For know I have given up. As I said you should at least be able to use my version of the setup.py script to get the new stack up and running. I ran my setup.py script and once the setup finally completed, I could then open my preferred browser and hit the various endpoints. The endpoint as indicated in the log output (AWS ELB url) plus one of the below:
/ /pet /vet /owner /visit
All would responded in a similar manner to the monolithic cloud formation stack from Part I. It is a completely re-architected microservice stack and you can see everything still works the same. The client has no idea that everything is now broken up into separate services. Once you have played a bit please make sure you destroy your stack so you do not run up too much of a AWS bill. From previous posts remember you can perform a cleanup through the same setup.py script.
python setup.py -m cleanup -r <your region>Enjoy!
Source of modified script (hosted on GitHub): setup.py